Let’s discover how to add custom fields in the last step of the WooCommerce order process : the checkout page. We will also see how to modify the cart price according to the value of these fields.
This is a translation of a tutorial I published on my French blog (Personnaliser l’expérience du tunnel de commande WooCommerce).
While developing a custom e-commerce store, third-party extensions are often used to customize the customer’s shopping experience.
But depending on the need, it is sometimes difficult to find a shoe that fits.
Let’s take some time here to understand how it is possible to customize the WooCommerce Checkout page to get a unique tunnel. With the right tools in hand, we will realize that it may not be that complicated!

The complete code of this tutorial has been grouped in a WordPress plugin freely downloadable here.
Objective of the tutorial
Before detailing what we are going to put in place, there’ s nothing like a picture to illustrate…
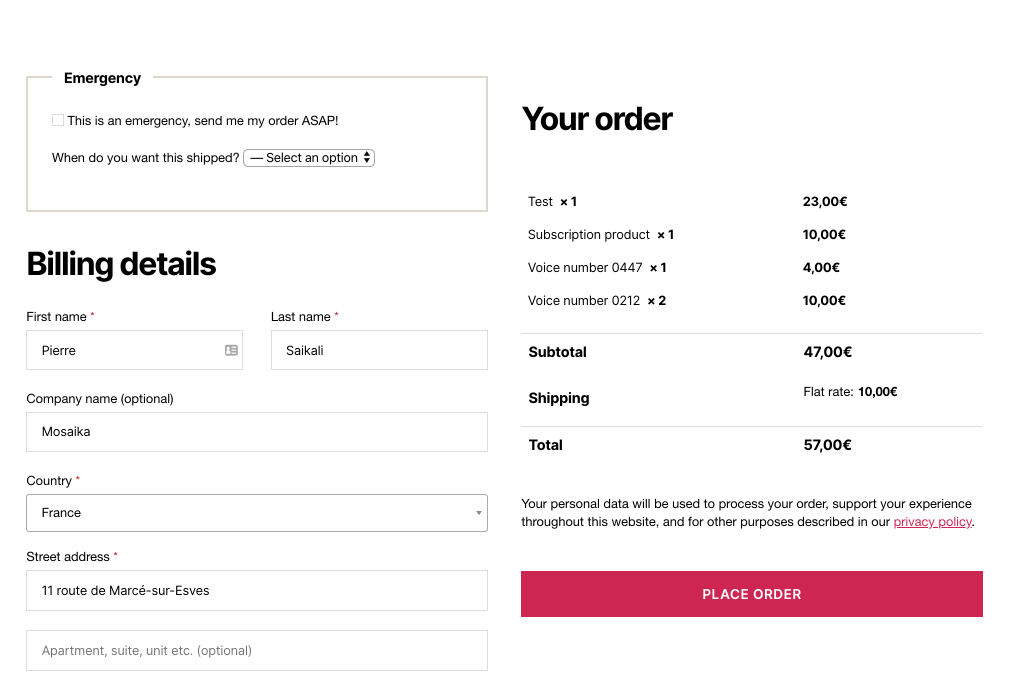
We are creating an online shop for buyers in a hurry. On the order page, we will add a field — before the billing details — where the customer will be able to:
- check a checkbox to indicate that he is in a hurry 🏃♂️
- use a drop-down menu to choose the emergency level 🚨
Depending on the urgency of his request, an additional fee will be added to his cart. This extra charge is equivalent to:
- 2 times the value of the cart for an ultra-fast shipment within the hour
- 1.5 times for shipment within 6 hours
- 1.25 times for shipment within 12 hours
- 1.1 times for a shipment before the next day
This little exercise will then allow us to add new fields on the WooCommerce checkout page, to validate these fields during the purchase and to add possible charges to the cart according to the value of these fields.
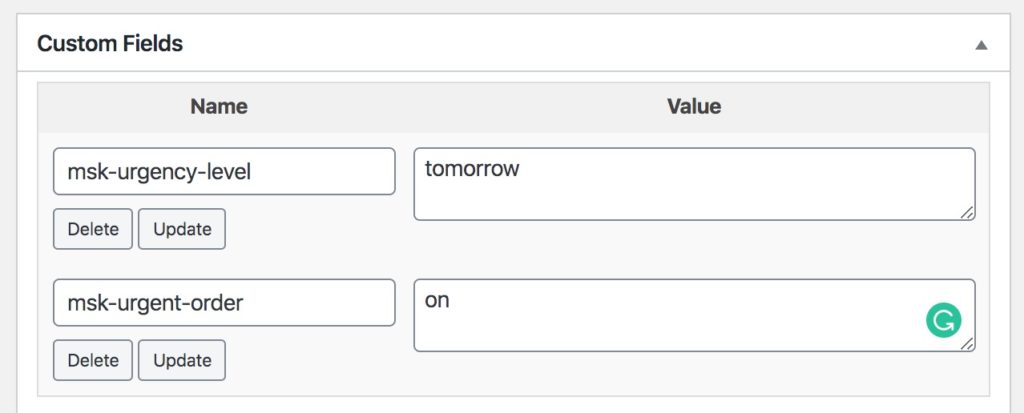
Once the order is placed, we will save the values of our 2 fields (by default totally unknown to WooCommerce) in the order metadata.
Handcrafting a new WooCommerce checkout experience
How to add custom fields to the checkout billing form?
The first step will be to add the new fields that we want to appear in the checkout form.
<?php function display_custom_shipping_methods() {
	?>
	<fieldset class="extra-fields">
		<legend><?php _e( 'Emergency', 'wc_ccf' ); ?></legend>

		<p>
			<label for="msk-urgent-order">
				<input type="checkbox" name="msk-urgent-order" id="msk-urgent-order" value="on" class="msk-custom-field" />
				<span><?php esc_html_e( 'This is an emergency, send me my order ASAP!', 'wc_ccf' ); ?></span>
			</label>
		</p>

		<p>
			<label for="msk-urgency-level">
				<span><?php esc_html_e( 'When do you want this shipped?', 'wc_ccf' ); ?></span>
				<select name="msk-urgency-level" id="msk-urgency-level" class="msk-custom-field">
					<option value="_null"><?php esc_attr_e( '— Select an option', 'wc_ccf' ); ?></option>
					<option value="next_hour"><?php esc_attr_e( 'In the next hour', 'wc_ccf' ); ?></option>
					<option value="next_6hours"><?php esc_attr_e( 'In the next 6 hours', 'wc_ccf' ); ?></option>
					<option value="next_12hours"><?php esc_attr_e( 'In the next 12 hours', 'wc_ccf' ); ?></option>
					<option value="tomorrow"><?php esc_attr_e( 'By tomorrow', 'wc_ccf' ); ?></option>
				</select>
			</label>
		</p>
	</fieldset>

	<script>
		// When one of our custom field value changes, tell WC to update the checkout data (AJAX request to the back-end).
		jQuery(document).ready(function($) {
			$('form.checkout').on('change', '.msk-custom-field', function() {
				$('body').trigger('update_checkout');
			});
		});
	</script>
	<?php
}
add_action( 'woocommerce_checkout_billing', __NAMESPACE__ . '\\display_custom_shipping_methods', 10 );
We’ll take advantage of woocommerce_checkout_billing hook to inject new fields in the order form. This hook will allow us to display them before the billing details requested to the customer.
Good to know
Look at the /templates/checkout/form-checkout.php template in WooCommerce to discover the different hooks available to insert your own additional fields. As I’m writing, WooCommerce offers no less than 8 actions placed at various places in the form. You should find what you need to place your new fields wherever you want!
Here, nothing fancy: we add our own HTML code to make new fields appear (in our case, a checkbox and a drop-down menu).
Be sure to use unique name attributes on your fields to avoid conflicts with any other native/third-party fields.
At the end of the function, a JavaScript code will tell WooCommerce to “restart its shopping cart price calculation” each time an interaction has been made on one of our two fields. We will be able to keep a cart price always up to date according to the urgency choice chosen by the buyer.
Triggering the update_checkout event on the body of the page allows WooCommerce to understand that some information has been modified and that it’s time to re-calculate the cart to deliver an adequate price to the customer.
Validate these checkout custom fields
Our fields are created, their values are sent to WooCommerce when we send the order. However, it’s a good idea to add a validation layer and check the validity of our new fields to potentially prevent the order from being sent and display an error message.
<?php function validate_all_checkout_fields() {
	$errors = [];

	if ( isset( $_POST['msk-urgent-order'] ) && $_POST['msk-urgent-order'] === 'on' ) {
		if ( ! isset( $_POST['msk-urgency-level'] ) || $_POST['msk-urgency-level'] === '_null' ) {
			$errors[] = __( 'Please tell us the <strong>level of emergency</strong>.', 'wc_ccf' );
		}

		elseif ( isset( $_POST['msk-urgency-level'] ) && ! in_array( $_POST['msk-urgency-level'], [ 'next_hour', 'next_6hours', 'next_12hours', 'tomorrow' ], true ) ) {
			$errors[] = __( 'This <strong>level of emergency</strong> is invalid.', 'wc_ccf' );
		}
	}

	/**
	 * If we have errors,
	 */
	if ( ! empty( $errors ) ) {
		foreach ( $errors as $error ) {
			wc_add_notice( $error, 'error' );
		}
	}
}
add_action( 'woocommerce_checkout_process', __NAMESPACE__ . '\\validate_all_checkout_fields' );
It’s the woocommerce_checkout_process hook in WooCommerce that allows us to perform any logic necessary to consider an order request as valid or invalid.
In our case, we are going to:
- lines 4 to 7: make sure the drop-down menu for the emergency level has a value other than the default “Please select…” option.
- lines 9 to 11: check that the emergency level sent corresponds to a valid emergency level among our 4 known ones. In this way, it is forbidden to send an unknown value.
In its validation process, WooCommerce will focus on error notices. If no notice is present, it will consider the order parameters as valid and will be able to continue its work (creating the order, sending e-mails, redirecting the user on the thank you page, etc.).
You can therefore invalidate the order request by adding an error notice with wc_add_notice( $message, 'error' ). The message will be displayed at the top of the page for the user to correct their error(s).
Dynamically modify the cart price according to these fields
As described in the introduction, we want to apply an additional charge to the cart according to the degree of urgency chosen by the buyer. It is the woocommerce_cart_calculate_fees hook that will allow us to dynamically apply charges on the cart.
<?php function add_emergency_fee( $cart_object ) {
	if ( is_admin() && ! defined( 'DOING_AJAX' ) || ! is_checkout() ) {
		return;
	}

	// Only trigger this logic once.
	if ( did_action( 'woocommerce_cart_calculate_fees' ) >= 2 ) {
		return;
	}

	$form_data = get_wc_posted_data();

	// Do not calculate anything if we do not have our emergency field checked or no emergency level is provided.
	if ( ! isset( $form_data['msk-urgent-order'], $form_data['msk-urgency-level'] ) || $form_data['msk-urgent-order'] !== 'on' ) {
		return;
	}

	// Store a mutiplier/coefficient to calculate the emergency fee.
	$multipliers = [
		'next_hour'    => 2,
		'next_6hours'  => 1.5,
		'next_12hours' => 1.25,
		'tomorrow'     => 1.1,
	];

	if ( ! array_key_exists( $form_data['msk-urgency-level'], $multipliers ) ) {
		return;
	}

	// Add the extra fee to the user cart.
	WC()->cart->add_fee(
		__( 'Emergency processing fee', 'wc_ccf' ),
		WC()->cart->subtotal * $multipliers[ $form_data['msk-urgency-level'] ],
		false
	);
}
add_action( 'woocommerce_cart_calculate_fees', __NAMESPACE__ . '\\add_emergency_fee' );
After a few preliminary checks (lines 2 to 16), we will calculate the price of the fee to be applied. We use WC()->cart->add_fee() to add a fee charge to the shopping cart by indicating its name as the first parameter and its price as the second.
The WooCommerce request is made in AJAX. So we have access to the values of the form stored in the $_POST variable, more precisely in the $_POST['post_data'] key that will have to be deserialized. We then use a homemade function called get_wc_posted_data() to access these values more quickly.
Make our new fields visible to the eyes of WooCommerce
When sending a (valid) order to WooCommerce, the processed form fields are limited only to those existing / known by WooCommerce. This is a security layer created by WooCommerce. It allows the plugin to completely ignore form values that would not come from WooCommerce or from extensions installed on the site.
This prevents malicious users from editing the data sent in an attempt to inject malicious code into the checkout process.
<?php function add_custom_checkout_data_to_order_data_array( $data ) {
	$custom_keys = [
		'msk-urgent-order',
		'msk-urgency-level',
	];

	foreach ( $custom_keys as $key ) {
		if ( isset( $_POST[ $key ] ) ) {
			$data[ $key ] = sanitize_text_field( $_POST[ $key ] );
		}
	}

	return $data;
}
add_filter( 'woocommerce_checkout_posted_data', __NAMESPACE__ . '\\add_custom_checkout_data_to_order_data_array', 10, 2 );
Fortunately for us, we can take advantage of the woocommerce_checkout_posted_data filter to indicate to WooCommerce that such or such field of the sent form can be used for our custom logic. In our case, we add two keys => values to the data array:
- the
msk-urgent-orderkey to know if the emergency checkbox was checked by the buyer, - and the
msk-urgency-levelkey to know the level of urgency chosen by the buyer
Even if our values have been validated upstream before the final submission of the form, remember to clean up the values received with the sanitize_...() functions of WordPress.
This data array therefore contains the values from the freshly sent checkout form. It will be used in the next step.
Save the fields values everytime an order is placed
WooCommerce has created a new order, it’s time to save the values of our custom fields!
<?php function save_custom_checkout_data_in_order_metadata( $order_id, $data ) {
	$custom_keys = [
		'msk-urgent-order',
		'msk-urgency-level',
	];

	$order = wc_get_order( $order_id );

	foreach ( $custom_keys as $key ) {
		if ( isset( $data[ $key ] ) ) {
			$order->add_meta_data( $key, $data[ $key ] );
		}
	}

	$order->save();
}
add_action( 'woocommerce_checkout_update_order_meta', __NAMESPACE__ . '\\save_custom_checkout_data_in_order_metadata', 10, 2 );
We take advantage of the woocommerce_checkout_update_order_meta hook that runs only after the creation of an order by WooCommerce in the front-end buying process.
Our hooked function will receive the ID of the created order but also the $data array from the order form. It is in this array that we have just saved our vital data regarding the urgency of the order.
In our case, we save these two custom data in the metadata of the order to keep in memory the user’s choice.
It is at this level that you will be able to really execute custom actions for a personalized e-commerce site. Sending an e-mail, delegating a process to an API, classifying the order… it’s up to you to process the different cases with the fields values that have just been added to the checkout form.
Conclusion
In a few steps, we successfully added custom fields on the WooCommerce order form. This custom shopping tunnel of our e-commerce shop will undoubtedly delight your most eager buyers 🤩!
Please share with us in the comment section about the different ways you used this tutorial 🙂